
Having trouble figuring out how to braid your kids’ hair? We have you covered with these simple, easy-to-follow guides. Braids are a timeless hairstyle for children of all ages and they are endlessly customizable. Bored with the same old braided styles? Mix it up! With this guide, you’ll be able to create adorable, safe and cute braids that you can even do at home in 10 minutes or less.
Let’s get started!
Step One:
Preparing Your Hair Braiding Kit. Before you begin, it is important to have all of your supplies ready to go and within reach so that you can work quickly. You will need a hairbrush, good quality braid clips (I like the Lilla Rose brand), at least three colors of ponytail holders or rubber bands in contrasting colors for creating plaits and braided flowers, small barrettes as spacers between sections if needed, an elastic band for pulling up long stray hairs behind the ears if necessary, scissors to trim ends of loose strands near face when finished styling… oh yeah. And some snacks too while I’m thinking about it 🙂 Also make sure there are hair ties or clips in the bathroom. I don’t know how many times my daughter has gone to wash her hands and then it takes me forever to find a hair tie for her ponytail!
Step Two:
Preparing Your Child’s Hair. Start by brushing your child’s hair until it is completely smooth from top-to-bottom. If you have long, thick lengths of hair like we do, try using a paddle brush instead of just a regular round one that can make their strands too flat at the crown of their head if brushed all over (and sometimes kids get frustrated when everything feels flat). Take some time here; this part really does go quickly so be patient with yourself and your little model as they sit patiently through this step!
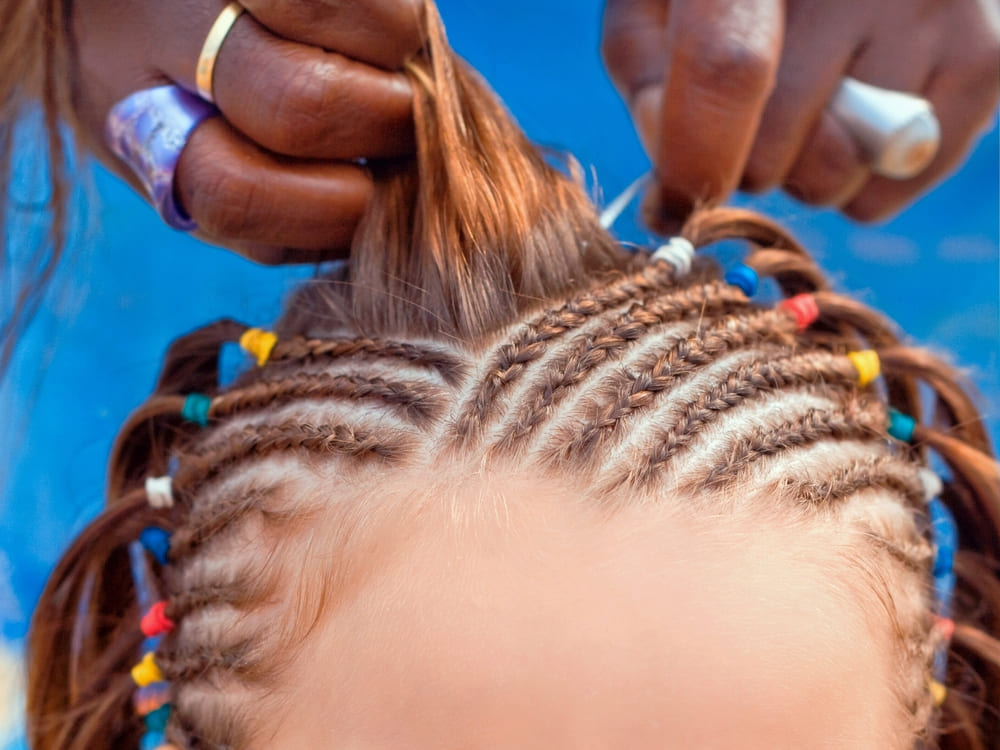
Step Three:
Sectioning the Hair. This is key for getting clean, professional-looking braids. You will want to divide their hair into four even sections; two in the front and two in the back. The front sections should be at each temple with enough hair to hold a rubber band around (about an inch thick). The back sections should start just below where the neck and head connect and go all the way down to the waistband or end of their shirt (or wherever you would like them to have long braids). If needed, use small barrettes as spacers between these sectioned off chunks of hair.
Step Four:
The Basic Braid. Now it’s time for the fun part! We’ll start with the basic single braid. This is a great braiding style for beginners to try on their kids as it requires little patience and only two ponytail holders or rubber bands in contrasting colors, one of which will be hidden at the end by being tucked behind the ends. You’ll want your first hair tie all set up before you even begin sectioning so that it’s ready when you are!
Step Five:
The Lilla Rose Flower Braid Spiral Step One: Unclip half of your child’s front ponytail holder (or rubber band) from underneath by pinching both sides together between thumb and pointer finger until they separate easily out of each other. Set this aside for now because we’ll use it later in step six.
Step Six:
Bring the right side of your child’s hair over and around to where you want it on their left. Make sure that section is held tight by a ponytail holder or rubber band so they can’t move it while braiding.
Step Seven:
Divide another one-inch thick chunk of hair from underneath with fingers, bringing this new piece across behind the first strand and placing it in front of them before reclipping everything back into place again with a ponytail holder (or rubber band). Don’t worry if these pieces start getting piled up as we will trim off any excess later! Just keep going until you get all the way down to the bottom at their waistband (if possible) so there are no gaps.
Step Eight:
Take the hidden hair tie from underneath and place it into a new ponytail holder (or rubber band) on top. If you have really thick, long strands like we do then this is where that paddle brush can come in handy! It’s much easier to smooth out all of your child’s loose ends first with one side clip so they don’t get tangle up during braiding. After we finish braiding each section I will use my fingers to pull any stray hairs back behind their ears for a neater look instead of clipping them off right away – especially if she has bangs since little ones always seem to push them forward while having fun.
Step Nine:
The last step involves plaiting together these two separate sections. You can choose to braid the two together all at once or do one side first, then come back and add in the other before tying it off with a new hair tie. The choice is yours!

Now your child has a really pretty, professional-looking braid that will last all day long (or until their next bath!). Be sure to experiment with different styles and techniques – there are so many possibilities! Braids can be fun, playful, elegant, or even sporty. The best part is that they always look neat and tidy no matter what the occasion may be. So go ahead and try out these simple steps on your little one today – you won’t regret it!